A View From The Cellar
A crash course in cellarmanship, Part V: Cask Troubleshooting Guide
In the final part of my series on casks, I present a troubleshooting guide. The first four parts are available in back issues of What’s Brewing online, here. There are many problems that can arise when serving from casks, and I won’t be able to cover them all here, so I’ll stick to the ones I deal with regularly.
The golden rule is to never move, shake, lift or otherwise touch the cask unless absolutely necessary. This must always be the last resort, as it will immediately stir up the sediment (lees), resulting in unsatisfactory pints for everybody. Most cask beers should be clear and bright, with no trace of yeast or particulate. If you have to do something that will stir up the sediment, leave the cask until it drops clear again. This might only take half an hour, but could take much longer.

Serving casks from a gravity tap
- The cask is very “lively.” Put a hard spile in firmly and cover it with a bar towel. Hammer in the tap, then carefully open the tap and vent out a few pints into a pitcher. Have a spare shirt on hand. This should stabilize the pressure. The cask may be very turbid, so leave it until it calms down, if possible. If the spile continues to fizz, draw beer off at the tap until the flow slows. At this point, loosen the spile and pour normally. Time will help; if possible, leave it a few hours as all that fizz will have agitated the lees.
- The cask is not pouring. Check that the spile is loose enough and that the tap is clean, not blocked or broken, and working properly. If it’s still not pouring, tighten the hard spile and let the flow ebb. You can then remove and replace the tap with only minor beer loss. Make sure the keystone is fully pierced and unblocked before replacing the tap with a clean spare.
- The cask is turbid. If the beer is not a cloudy style, the cask may have been moved or the finings may not have worked. Try to wait for the sediment to drop to the bottom of the cask in a cold environment. If the beer has been properly fined, this won’t take too long. It might not be perfectly bright, but it shouldn’t be lumpy.
- The tap is leaking. Check if it is leaking around the tap or around/through the keystone. If around the tap, make sure the tap is hammered in properly. If it is leaking through the tap, check that the nut at the bottom of the tap is tight (if it has one). If it still leaks, follow step 1 above to replace the tap. While it is out, inspect the keystone. If the leak is at the keystone (perhaps a wood one has split), there’s not a lot that can be done, other than tie a cloth around the tap or put a pitcher on the floor to catch the drips. If time is not a factor, you can replace the keystone, but the beer will become oxidised and will not keep.
- The beer is flat. Not much can be done. The cask may have warmed up, been left unsealed, been moved or tapped badly, or wasn’t sufficiently conditioned by the brewer. Brewers have been known to add dry ice to carbonate and chill a cask (ahem, G.W.), but I would not recommend it.
Serving casks from a beer engine
- The beer is not pouring or the pump is stiff. Check that the tap on the cask is open and the spile is a soft spile or a loose hard spile. Check that the line is connected. If this doesn’t fix anything, disconnect the line and open the tap to check that the beer is flowing. If it’s not, check step 2 above.
- The beer won’t stop pouring. Make sure the cask is below the pump. If the cask is too lively the pressure from the cask may fill the line, so loosen the spile and draw off a few pints if necessary.
- The cask is sputtering or there is air in the line. The cask is a little too lively and gas is leaving the beer, creating pockets of gas in the line. This is more common in narrow and unbraided hose lines such as pub keg lines. Time will let the cask settle and calm down. If it’s a cask that has been served for a while, check the level of the beer (see below). If it is low, gently chock up the back of the cask by a few degrees. This will submerge the back of the tap so more beer can be served. Check the first pour from this. If it is yeasty and cloudy, consider discarding the rest of the cask.
- The beer tastes vinegary or sour. Unless it’s a style that should be sour, this means the cask has turned. Air in the cask ullage (which can be beneficial at first) will eventually make the beer go bad. There’s not much you can do about this, unfortunately. Keeping the cask cold will slow this process so the beer lasts for around two weeks. In the old days, publicans would blend it with fresher beer to hide the flavour. This practice has shaped many historical beers and styles such as barley wine, brown ale, gueuze, and most lambics. It is possible to use a low-pressure “breather”, which replaces the air in the cask with carbon dioxide. These work well if used correctly, but are not traditional and not necessary if you are able to drain the cask in less than two weeks.
- The beer is too foamy or turbid. Remove the sparkler, if using one, and pull the pint slightly slower; only part of the line might be cloudy
- The beer tastes different, but still fine. Casks can change their flavour profile over time. Generally, I find that they improve steadily from day 1-6, then plateau for a few days before turning sour, as long as the cask is kept cold and still.
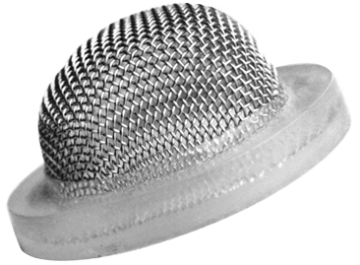
- The beer is coming out of the sparkler at a weird angle and/or rate. Take the sparkler off and make sure the beer is pouring normally. Then check that the sparkler is clean and the holes aren’t blocked. If they are getting blocked again and again from the same cask, perhaps hop particulate hasn’t settled out properly. Consider adding an inline filter at the tap. A pop filter creates a barrier to particulate between the tap and the line. The rubber ring also works well to create a drip-free seal. Remember that this can get blocked and must get cleaned regularly.

More Pro Tips
- If you want to know how much beer is left in a cask, do not lift it up! This will stir up the sediment. You can either:
- Tap the side gently with your fingernails. You should be able to identify how much is left by the change in tone.
- Look at the side or ends. You may be able to see a line of condensation that will tell you the beer level. You may also be able to feel the change in temperature as you run a finger down the side of a metal cask.
- The best answer is: There’s enough to keep pouring. It’ll run out when it runs out. Do you really need to know how much is left?
- If possible, find a beer engine for your cask. It makes a big difference when serving.
- Don’t let other people lift or move your cask once it’s in its serving location. They are clearly uninformed about the right way to treat a cask.
- Always have a few bar towels on standby as well as a few hard and soft spiles. A spare shirt and pair of pants can be handy, too.
- When tapping a cask, try to have someone brace it from the back or have it as flat to/against the wall as possible. After all, you are hitting it from the front quite hard.
There’s plenty more, but if you have any other questions contact me ac.ksaclaer@mada and I’ll do my best. This is the end of my cask series; I hope you have found it interesting and useful. If you have any feedback, please feel free to contact me by email or @realcask. Next issue, I’ll be looking at line cleaning and why it’s vitally important to good-tasting beer.
How long can a cask be kept before going flat? How do you clean a cask?
Hi Greg, once opened a cask can go flat in a few hours, if it is kept still and cold it’ll last several days, even a week or so, Temperature is the key. When one considers that CAMRA UK recommends a carbonation level of 1.2 in real ale it’s not difficult to retain some residual CO2. If a cask is sealed it will, theoretically, keep indefinitely.
Cleaning casks is a chore, they should be sealed or rinsed as soon as possible after use. Use a flash light or other source to illuminate the cask from the keystone end then look in the shive hole, if there’s still dried on lees then use a high pressure hose to move it the or leave it overnight filled with hot PBW . Once I’m satisfied it has been rinsed clean. I fill a large tub with a hot caustic mix and then dip the whole cask, filling it. I leave it in the caustic a for a few minutes then let it drain back into the tub, after that I dip it into a light acid or sani mix to take out the caustic then I gave it a sani bath immediately prior to racking. I tend to do a dozen at once so get a little production line going.
Thanks for your question Greg! I’m working on a postbag edition of my column for the future so if you or anyone else would like to message me